Friday, October 31, 2014
Samsung Galaxy S3 I9300 unlock pin code

If you forgot your unlock pin code just follow these steps to reset your phone.
1.Power off your phone
2.Push together volume up + home button + power key
3.Select with volume keys "wipe data/factory reset" and push power to confirm
4.Select "yes"
5.Wait until format ends
6.Push power key to confirm "reboot"
7.Wait until the phone restarts
Thursday, October 30, 2014
How To Factory Reset Motorola Dext
How To Factory Reset Motorola Dext
- Holding the Camera button while turning on your phone,
- When prompted hit the Volume-Down rocker button to go into Recovery Mode.
- After you get into Recovery Mode,
- Press ALT+L to reset, then Menu+Back to reboot.
Wednesday, October 29, 2014
Nokia Asha 311 WiFi Not working Problem Solution Ways
 WiFi is used for networking a Smartphone with some other networking devices and it works for VPN (Virtual Private Network ) to gain a high speed broadband speed at you smart phone Nokia 2320 Classic Hang problem solutionsee all cellular mobile repairing solution
in above diagram you can see a red line that identify parts used in wifi function in Nokia Asha 311.So after disassemble of mobile phone look all these parts very carefully and if there is some rust or water damages clean them with electronics cleaner and apply smoth heat with hot air. do not apply to much air because it can harm your skin and also can damage the mother board.
So re flow resold these parts and if it can not solve problem replace these parts that are given in above diagram.
for more detail and new tips and tricks about cellphone service problem keep visiting this page we will update cellphone service diagrams timely with new cellphone diagrams.some related post are also given bellow you can read them also for more information about cellphone.
How to HTC Master Reset or HTC Hard Reset a HTC S620 or HTC S621
To perform a HTC master reset HTC hard reset on your HTC S621 / HTC S620 you will need to:
1. PRESS AND HOLD BOTH SOFT KEYS.
2. WHILE HOLDING DOWN SOFT KEYS, PRESS AND RELEASE THE POWER BUTTON, WAIT 3-5 SEC. (PHONE SHOULD POWER ITSELF ON BY DOING THIS)
3. RELEASE THE TWO KEYS SOFT KEYS.
4. WHEN SCREEN ON DASH LOOKS LIKE ITS IN DOS FORMAT, PRESS SEND (GREEN ANSWER KEY)
or
With the phone on
Select Start> Accessories> Clear Storage> enter reset code default is 12345> Select YES.
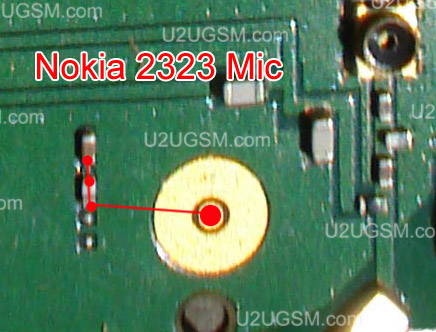
Nokia 2320 Classic Mic Problem Solution Jumper Ways
 Nokia 2320 Classic then you can not make a voice call and also you will not be able to make call recording in it.to solve this mic problem in Nokia 2320 Classic you can follow a few steps and can look at diagram bellow all cellular mobile repairing solution here Nokia Asha 311 Lcd Keypad Led light problem solution jumper ways In above diagram you can see mic and its ways all mic tracks are given in different colors and you can apply jumpers as shown in it.
You can replace mic also with this diagram and following to its tracks you can fix microphone problem in Nokia 2320 Classic.
for more detail and new tips and tricks about cellphone service problem keep visiting this page we will update cellphone service diagrams timely with new cellphone diagrams.some related post are also given bellow you can read them also for more information about cellphone.
Nokia C5 06 Display Problem Lcd Solution Jumpers
A diagram to repair Nokia C5-06 display problem is also attached with this post as above.After dis assembly of Nokia C5-06 try to replace lcd. If lcd replacement can not solve display problem in Nokia C5-06.
Check all these tracks that are given in above Display repairing diagram for Nokia C5-06. These different color lines are identifying the paths and components that are used in display function of Nokia C5-06.
Check all these parts with meter and if any of them is missing or damage apply jumpers as given in above diagram for Nokia C5-06 blank lcd white display or no display solution.
This diagram is sent to us by one of our guest poster and it is taken from gem-flash a gsm portal.
for more detail and new tips and tricks about cellphone service problem keep visiting this page we will update cellphone service diagrams timely with new cellphone diagrams.some related post are also given bellow you can read them also for more information about cellphone.
Tuesday, October 28, 2014
Nokia X6 Camera Slider Lock Volume Up and Volume Down Control Button Switches malfunction solution
If the said button switch is okay seems working but still unresponsive you may then consider that the problem may lies on a faulty circuit components on the PCB board.
This solution below shows the line paths of each particular button switches of the camera, slider lock and the volume up and volume down buttons.

Ensure that the button switches is perfectly clean and working okay.
There is an EMI-ESD filter IC is connected to each button switches line paths., Check this filter IC and trace the corresponding button switches line paths first before trying to replace it.
The Volume up control switch is connected directly to the I/O expander chip, you may check and rework this
chip if only the volume up is not working without touching the ESD filter IC.
Nokia C5 00 Charger Not supported Problem solution

Replacement of battery can solve this problem.And if that can not solve charger not supported problem try same with an other charger.the next step is to disassamble the mobile phone.
In above diagram a resistance is in lined with red color and you can replace it to solve charging not supported in Nokia C5-00. You cna take this resistance from any other board of nokia.
for more detail and new tips and tricks about cellphone service problem keep visiting this page we will update cellphone service diagrams timely with new cellphone diagrams.some related post are also given bellow you can read them also for more information about cellphone.
Monday, October 27, 2014
Download Call Logs Backup Restore App For Android devices

Simply you should to create a special folder where call log backup will be stored.
The backup is stored by default in /sdcard/CallLogBackupRestore folder.
This application helps if you need to keep a history of your all the calls (made from or received on your device). The Android system operation have possibility to keep a history of the 500 latest calls and any another call older is automatically deleted when the call overcome this limit.
Call Logs Backup & Restore has support for up 500 calls and with this app you can easily restore all the call log on your phone.
Another great function for this small application it is the possibility when you made an update for your phone, rooted or flashed the firmware of your device and lost all call logs, ‘Call Logs Backup & Restore’ is able to backup and restore your call logs. It is very easy to download it and install it on your smartphone, only go and click here to download Call Logs Backup & Restore from Google play market store.
The application comes with great features:
- The format for Backup Call Logs / History is in XML format.
- You can choose a scheduled time to automatically backup every day if you want to have an auto save job.
- Like as say before, you can choose the name of the file to make the backup.
- You can easily to open with a browser the XML file for viewing easily the content.
- We have the option to adding the date in readable format.
- Another great option it is to use an “Archive Mode” where the backup data keeps getting added to a single file.
- The Backup format is independent of the Android version, so you can easily to move your call logs from an old Android version to a new one, or invers.
- We have the option to select the backup file to be restored from the folder.
- We can easily view Backup Contents from within the App.
- With this application we can delete all Call Logs on the Phone.
- The application has possibility to Email us a backup file.
- A specific Option it is to delete old files automatically after specified number of days.
Backup: with this button we can to back-up all the Call logs on the phone to the xml file.
Restore: with this button we can read the xml file and creates a new Call log for every entry found in the file. The Duplicates are checked based on number, duration and date/time of the call.
View: with this button we can view the contents of the backup file.
Delete Backups: This button allows us to make a selection of backup files to be deleted.
Delete Calls: This button helps us to deletes all the Call logs on the phone, so that a Restore can be performed.
Donate: with this button if you wish to donate for the App via PayPal access this button.
In Menu Option we find:
Help: – with the help information about the ‘Call Logs Backup & Restore’ App.
Preferences: with this option we can open the Preferences Screen.
Send by Email: this option allows you to send the backup file by a custom email.
Sunday, October 26, 2014
Nokia 7210 Supernova Insert Sim Card Problem solution

Hints for repair: check the sim socket pin connector if free from corrosion and oxidations. Check the Vsim power supply voltage line paths from the Vsim chip capacitor located near the power supply IC. check and replace the corresponding connected resistors which has a value of 33 ohms.
Saturday, October 25, 2014
Nokia 5130 mic problem repair solution
Nokia 2710 Mic, mouthpiece, microphone problem solution

Friday, October 24, 2014
Flash the Official SlimKat 4 4 2 Nightly Builds for Samsung Galaxy S4 I9505 Guide

- During this step by step guide, we will show you how easily to install the Official SlimKat 4.4.2 Nightly Builds on Samsung Galaxy S4 I9505 device. Note that this guide is for advanced Android users only.
- This guide is compatible only with Samsung Galaxy S4 LTE model number I9505 device with the Snapdragon 600 the International variant. So by knowing that this step by step guide will not be compatible with the US Galaxy S4 LTE versions of Samsung Galaxy S4 device nor with the I9505 (Exynos) model of the S4 smartphone.
- The Samsung Galaxy S4 I9505 device has to be a rooted one and to have the latest CWM Recovery Image version installed on it. We don’t test this guide with the TWRP Recovery image.
- Backup all your data stored into S4 device and create a full NANDROID Backup for the existent installed ROM, this backup will represent a restore point in case you don’t like the new custom ROM or something work wrong.
- The step by step guide will contain a Factory Reset step that will help the user to apply a clean installation for the new custom ROM.
- Important: The Factory Reset action will wipe all data from the system partition, but the internal/external storage cards will not be affected by this Factory Reset step.
- Backup all your application installed on the S4 device, SMS text messages by using the Helium application, a step by step guide about how to do this is available here.
- Save your contacts from your device, to do this you need to sync contacts info with your Gmail account. Guide here.
- Ensure that the device’s battery charge level is more that 60 %, this will prevent your device to take a forced power off in the middle of the flashing process.
- This guide is provided only for educational and instructional provide, so do not blame us in case something wrong is happen by applying this guide on your device, we cannot be held liable or responsible for any data lost or damage of your device during or after the flashing process.
- Do not skip any steps from this guide.
- From Developer Option menu, enable the USB Debugging mode. Developer Option, in some cases might be hidden, so you should open the Settings menu, then More and go to About Phone and press Build Number seven times.
- If you cannot complete this step by step guide, then you can use our comments section for more help.
How to install SlimKat the Official Nightly custom ROM for Galaxy S4 LTE:
- Firstly, download the SlimKat custom ROM zip from here, download the latest build available.
- Secondly, download Gapps for SlimKat ROM from here.
- Now, connect the Samsung Galaxy S4 LTE I9505 device to your computer.
- Move (Copy/Paste) the both downloaded zip files to the device’s internal storage. Ensure that you don’t unzip the contents.
- Once the both files are copied successfully, disconnect the smartphone from the computer.
- Turn off the smartphone now.
- Boot the device in CWM or TWRP Recovery Mode. Guide here.
- Create the Nandroid ROM backup for your existent ROM. To do this you should select ‘backup and restore’, then give a name to the file and confirm the process.
- Apply the Factory Reset, by selecting ‘wipe data/ factory reset’ and confirm. Then you need to use the ‘format /system’ option too.
- Next, select ‘install zip from sdcard’, then ‘choose zip from sdcard’ find the ROM file and confirm the installation to install the SlimKat 4.4.2 Weekly custom ROM.
- Once the new custom ROM is flashed you need to repeat step 10 actions to flash the Gapps zip file.
- After the both files are successfully installed, then you can return to the main Recovery menu.
- From the main Recovery menu reboot the smartphone now into normal mode.
- The first boot process will takes around five minutes to be done. So, do not press any buttons until the first home screen to appear.
- Now, put your Google account info when you’re asked and take control over the phone.
Thursday, October 23, 2014
How to Root the Motorola Droid 2 Global
- Backup your phone’s data and be sure the charge the battery to at least 80%.
- Enable USB Debugging on your smartphone. (Settings > Applications > Development) and tick the USB Debugging option.
How to Root the Motorola Droid 2 Global 2 running Android 2.2 Froyo
- Go to Download the z4root APK application package, copy it into your smartphone’s memory and install it.
- Once the installation is done, go to launch the z4root app on your phone.
- Press the Permanent Root button, the application will root your phone. (BusyBox will be installed as well).
- After that the phone will reboot afterwards. In next step go to verify if the rooting process was successfully by running the z4root app again, if you’ll see Re-root and Un-Root buttons, this means your smartphone is already rooted.
How you Root the Motorola Droid 2 Global running on Android 2.3 Gingerbread:
- For this procedure you need a Windows PC.
- First must to install the Motorola USB drivers on your Windows PC . The drivers are available here: for 32-bit Windows and for 64-bit Windows
- Download Pete’s Motorola Root Tools and go to extract the files in your windows computer.
- Connect the Droid 2 Global device to the PC.
- Launch Pete’s rooting app(double-click on Pete’s Motorola Root Tools.exe located where you extracted the files)
- Click on the Root My Phone button.
- Now wait approximate 3 minutes, your device will restart and you’re ready to go.
Install I9300XXUGML3 Official Firmware on Galaxy S3 to Android 4 3 Guide

- Android Source Team provide this guide for educational and instructional purpose, so we will not be held liable or responsible for any data lost or damage to the device during or after the ROM installation. Apply this guide only on your own risk.
- Download and install suitable USB Drivers for Samsung Galaxy S3 device on the PC. Download link for USB Drivers here.
- Enable the USB Debugging Mode on the smartphone from Settings>Developer Options.
- A full backup is required to avoid potential data delete or corruption, so backup all your important data stored into Galaxy S3 device’s internal memory.
- The Galaxy S3 device should be factory unlocked, not locked in any specific carrier.
- Ensure that the device’s battery has more than 85 % power left.
- The new official Android 4.3 (I9300XXUGML3) firmware is fully compatible with all Galaxy S3 GT-I9300 devices only. Do not use this firmware in any other incorrect versions of Android devices as it may damage or brick your device.
- To be sure about the device model verify this by navigating to Settings>>About Phone.
How to update Samsung Galaxy S3 with Android 4.3 I9300XXUGML3 Jelly Bean Firmware:
- Download Android 4.3 XXUGML3 JB Firmware for Samsung Galaxy S3 I9300 device.
- Download ODIN application from here.
- Now, extract the downloaded Android 4.3 JB firmware to obtain a .tar.md5 file and some other additional files.
- Now, extract the ODIN archive to get ODIN3 v3.07.exe and some other files.
- Turn off the Samsung Galaxy S3 device.
- Boot it into Download Mode. (Press and keep holding the Volume Down, Home and Power buttons in the same time until an Android icon with together with a warning triangle will be displayed on the screen and then press once again the Volume UP button).
- Open the ODIN application on PC as an Administrator.
- Now, by using the USB cable with the device in Download Mode connect the Samsung Galaxy S3 device.
- When the ODIN application detects the S3 device a “Added” message will appear on the display and the ID:COM box with the COM port number will turn light blue. If the “Added” message fails to be displayed try to reinstall once again the USB drivers.
- Now, load the extracted files in ODIN application from the extractedI9300XXUGML3 firmware folder:
- · From ODIN tap on PDA button and from there select the .tar.md5 file.
- · From ODIN, tap PDA button and select the .tar.md5 file.
- · From ODIN select the CSC button and chose the file named CSC.
- · From ODIN click PIT button and select the file with the .pit extension.
· Note: if the MODEM, CSC and .pit files are not found you should ignore these steps.- In ODIN application select Auto Reboot and F. Reset Time options. The Re-Partition option must rest checked only if you have a .pit file in the previous steps.
- Now, verify once again all the steps to be done correctly.
- Press on START button in ODIN to start the flashing process.
- Once the new official firmware is completely installed a “PASS” message with a green color on the background will be displayed in the left top of ODIN application.
- After that the Samsung Galaxy S3 device will get an automatically reboot to the Home screen.
- Disconnect the USB cable from the PC.
- These were all the steps in order to install the new official Android 4.3 I9300XXUGML3 JB firmware.
- Verify the OS version from Settings>About Phone.
Blackberry 9900 cellular phone usb repair solution

Blackberry 9000 Cellular phone sim ways repair solution

Wednesday, October 22, 2014
Blackberry Bold 9000 LED Light LCD jumber ways Solution

Nokia C5 Not Charging Problem Repair Solution
This solution may works on charger no response indication when any working battery charger is plug-in to the DC jack. Nokia X3 Display problem solution, Full Display IC Jumper ways Solution

1. Visually check the charging pin connector( DC jack) for possible damaged, clean,fix if the terminals is misaligned or replace it.
2. Clean the charging pin terminal contact pads.
3. Check the battery and try using another working phones battery.
4. Check the battery terminals, clean if oxidized.
5. Check/replace the fuse
6. Check /replace the chip diode
7. If the above procedures doesn;t fix the problem, the possible faulty is the GAZOO IC, reworking or replacing it will only fix the problem.
Saturday, October 18, 2014
Nokia Asha 311 Mic Problem Jumpers Ways Solution
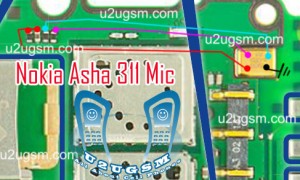
once you have dis assembled mobile phone look at board vary carefully and check if there is some rust or carbon.Clean
these parts and area with electronics cleaner and leave it to dry for a few mints with hot air.In above diagram all tracks are given in red and blue colors.these tracks show positive and negative paths of mic parts.so check these components and paths with electronics miter and if path missing apply jumpers.
Because mic is attached with board so you can remove it with solding iron by applying much solder on mic and then slip it once it is too hot.And use new mic to fix mic problem in Nokia Asha 311.
for more detail and new tips and tricks about cellphone service problem keep visiting this page we will update cellphone service diagrams timely with new cellphone diagrams.some related post are also given bellow you can read them also for more information about cellphone.
nokia c2 00 light ways jumper solution display lights solution

In above diagram you can see some colorfull lines that are in red and blue colors. these lines are defining different tracks paths of components. these parts are used in light function in nokia c2-00.
check all these tracks with meter and if any of them is missing then apply these jumpers as given in above diagram to solve light problem solutions.
for more detail and new tips and tricks about cellphone service problem keep visiting this page we will update cellphone service diagrams timely with new cellphone diagrams.some related post are also given bellow you can read them also for more information about cellphone.
Friday, October 17, 2014
Nokia C5 03 Insert Sim problem solution

In above diagram red color line is identifying an IC that is used in sim function.After dis assembly of Nokia C5-03 check this IC and its near by area.
If you found some rust carbon or water damages then it can also be cause of Nokia C5-03 insert sim problem to solve and fix insert sim problem in Nokia C5-03 clean all the rust and carbon with electronics cleaner and apply hot air to make it dry.
Re sold or Re flow this Ic and if resolding can not solve insert sim problem in Nokia C5-03 then replace this IC.
for more detail and new tips and tricks about cellphone service problem keep visiting this page we will update cellphone service diagrams timely with new cellphone diagrams.some related post are also given bellow you can read them also for more information about cellphone.
Nokia X2 05 Lcd Display Jumper Ways Problem Solution

After disassambly of Nokia X2-05 look at the motherboard for rust carbon or burren parts. If you found some rust or carbon apply electronics cleaner on the mother board and apply hot air to make it dry proper.
Applying too much heat can damage the mother board and parts.It also can be harm for your skin.So keep in mind about normal heat flow when making it dry.
Remove old LCD and Check it with new one. In above diagram you can see some different color lines that are pointing to the parts which are used in Display function of Nokia X2-05.
Check all these parts with help of meter and apply jumpers as shown in above diagram to solve display problem in Nokia X2-05.
If you find some broken and missing components then apply jumper on points where small circles given in nokia lcd problem solution.
Nokia 6131 Not Charging Solution

Nokia 6131 Charging Problem,
Nokia 6131 Alien Battery,
Nokia 6131 Charging Ways,
Nokia 6131 Charging Solution
Nokia 6131 Charging Tracks
Nokia 6131 Charger Not Supported
Nokia Asha 203 Usb Not Charging Problem Solution Jumper Ways
In above diagram you can see Red, Blue & Black lines these are used in usb charging and usb data functions. Check USB charging jack if it have some carbon or rust then clean it with CTC and apply heat to make it Dry.
If USB charging jack of nokia asha 203 is damage or Replace it. If a few pins are missing then check all these tracks that are given in above Nokia asha 203 usb not charging diagram. If any print out of these is missing apply jumpers.
Check all these parts and if any of them is broken or damage apply jumpers. If jumpers can not solve usb data & charging problem of nokia asha 203 then replace these parts.
for more detail and new tips and tricks about cellphone service problem keep visiting this page we will update cellphone service diagrams timely with new cellphone diagrams.some related post are also given bellow you can read them also for more information about cellphone.
Thursday, October 16, 2014
6100 Led Solution 6100 Led problem 6100 Led Ways 6100 nokia

6100 Led problem,
6100 Led Ways,
6100,nokia
Wednesday, October 15, 2014
Complete Specifications of Nokia X Dual SIM

Nokia asha 305 speaker solution
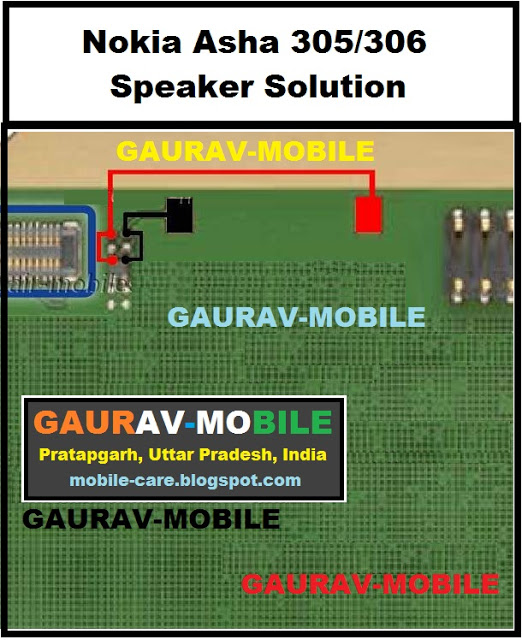
In above diagram you can see red and blue lines.These lines are tracks and paths that are used in speaker function in Nokia asha 305. So check all these parts with meter and if any of them is missing apply jumper.You can apply jumper at points that are shown in diagram for repairing speaker problem solution.

Tuesday, October 14, 2014
Nokia N70 N72 low battery early discharge battery solution 100 working

Nokia N70 N72 low battery early discharge battery solution 100 working

Monday, October 13, 2014
nokia 101 ear speaker problem

In above two lines are given one is blue and the other is red. Both lines are used in ear peace speaker function of nokia 101. and these paths that are identified in the diagram.
Nokia 5800 slider key not working problem solution
nokia 101 sim ways
if button shows value with meter then replace slider button and if value is missing in these points then apply jumpers as given in above diagram.slider key is also used as key guard key to apply and dis apply key guard in Nokia 5800.
for more detail and new tips and tricks about cellphone service problem keep visiting this page we will update cellphone service diagrams timely with new cellphone diagrams.some related post are also given bellow you can read them also for more information about cellphone.
Sunday, October 5, 2014
How to Root Micromax Canvas Knight A350
Micromax Canvas Knight A350 Key Features:
- 2 GB RAM with 32 GB Internet Memory
16 MP Primary Camera with LED Flash and 8 MP Secondary Camera
5 Inches IPS LCD Touch Screen
Android 4.2.2 Jelly Bean OS
2 GHz Cortex A7, Mediatek MT6592T Processor
Dual SIM
How to Root Micromax Canvas Knight A350
Friday, October 3, 2014
Nokia 5250→RM 684 Latest Version 30 0 002 Flash File Free Download

Nokia Mobile 5250 → RM-684 Update Flash File Here
Phone Name : Nokia Mobile 5250
Product Type : RM-684 Firmware Version : 30.0.2 Variant Id : 5676674895 Varian Name : Vietnam Product Code : 059B6W0File Name : Rm-684 30.0.002 Prd.core.c00
File Size : 88.14 Mb
File Name : Rm-684 30.0.002 Prd.rofs2.v20
File Size : 24.25 Mb
File Name : Rm-684 30.0.002 C04 Prd.rofs3.fpsx
File Size : 3.26 Mb
File Name : Rm684 30.0.002 000 000 U001.uda.fpsx
File Size : 16.96 Mb
File Name : Rm684 059b6w0 30.0.002 001.dcp
File Size : 14.67 Kb
File Name : Rm684 059b6w0 30.0.002 001.spr
File Size : 2.35 Kb
File Name : Rm684 059b6w0 30.0.002 001 Signature.bin
File Size : 1.85 Kb
File Name : Rm684 059b6w0 30.0.002 001.vpl
File Size : 4.57 Kb
File Name : Rm-684 Data Block
File Size : 4.02 Kb
File Name : Simlock 3gstandard Bb5.bin
File Size : 964 Bytes
File Name : 08970602.pcx
File Size : 8.64 Kb
File Name : 08970604.xml
File Size : 3.38 Kb
File Name : Hwt Fox Pi269 Cmt For Size 059b6w0 V1.bin
File Size : 212 Bytes
File Name : Ccc Fox Pi269 Cmt For Size 059b6w0 V1.bin
File Size : 352 Bytes
File Name : Cardverref Nocard.xml
File Size : 116 Bytes
Thursday, October 2, 2014
Samsung Galaxy Fame S6810 Hard Reset Instructions
Samsung Galaxy Fame S6810 Hard Reset Instructions - The Samsung Galaxy Fame S6810 is dual sim phone that support for GSM/HSDPA network. It comes with 3.5 inches, TFT capacitive touchscreen with 320 x 480 pixels resolution. Its powered by 1 GHz processor and runs on Android 4.1.2 (Jelly Bean) operating system with 512 MB of RAM. The phone also equipped with 5 MP camera and available 4 GB internal memory. If you are owner of this smartphone and looking information about instructions how to hard reset for Samsung Galaxy Fame S6810 smartphone? Ok, you can read below:
Samsung Galaxy Fame S6810 Hard Reset Tutorial:
First, back up all data
Then on your phone screen, press *2767*3855#Â Â - be careful, you must remember, all data will be lost!
Further how to soft reset for the Samsung Galaxy Fame S6810? Follow this instructions:
To reset the phone if it has fatal errors or hang-ups, or freezes, you must press and hold for 8-10 seconds or you can take out the battery and reinsert it.
Samsung Galaxy Fame S6810 Factory Data Reset Guide:
Press and hold the Power button for 8-10 seconds. The device reboots automatically Or If this does not solve the problem, perform a factory data reset. On the Applications screen, tap Settings > Backup and reset > Factory data reset > Reset device > Erase everything
