Pages

Sunday, August 31, 2014

Samsung Omnia M GT S7530 factory data reset

Samsung
Samsung Omnia M GT-S7530 factory data reset
Performing factory data reset ( master reset or hard reset ) Samsung Omnia M GT-S7530 via Settings menu:

Perform factory reset


  1. Go to Menu
  2. Select Settings
  3. Select System
  4. Select About
  5. Select Reset your phone
  6. Select Yes
  7. To confirm select Yes

Warning! All data will be erased from device memory, including system and application data, settings and downloaded applications. Back up your important data.  The device will restore to factory settings.

If your phone hangs or does not responding, Press and hold power key about 10 seconds.  It will rebooting automatically.  Or remove and re insert the battery and SIM Card.

Tips: If your device has a touch screen and the touch screen is not responding properly, try the following:
Samsung Omnia M GT-S7530 factory data reset

  1. Remove any protective covers from the touch screen.  Protective covers may prevent the device from recognising your inputs and are not recommended for touch screen devices.
  2. Ensure that your hands are clean and dry when tapping the touch screen.
  3. Restart your device to clear any temporary software bugs.
  4. Ensure that your device software is upgraded to the latest version.
  5. If the touch screen is scratched or damaged, take it to your local Samsung Service Centre.
ReadHere..

Samsung Galaxy Mega 5 8 I9152 with Android 4 2 2 XWUANA6 Jelly Bean Official Firmware How to Update Using Odin Guide

Samsung Galaxy Mega 5.8 with Dual SIM card slots also known as Galaxy Mega 5.8 DUOS has started receiving a new Android 4.2.2 Jelly Bean update with firmware build number I9152XWUANA6. The new official firmware is now available as an Over-The-Air (OTA) update as well as through Samsung KIES.
Firmware details
PDA: I9152XWUANA6
CSC: I9152OLBANA3
MODEM: I9152XXUAML4
Version: Android 4.2.2
Build date: Jan 29, 2014
Regions: Indonesia, Malaysia, Philippines, Singapore, Thailand, Vietnam
Samsung Galaxy Mega 5.8 I9152 users who missed the OTA update notification or unable to access the update over Samsung KIES, may follow our step-by-step guide to install the update manually.
Pre-requisites
1. Install USB Drivers for Samsung Galaxy Mega 5.8 on the computer.
2. Enable USB Debugging Mode on the phone by navigating to Settings >> Developer Options.
3. Make a backup of all your important data before following the guide.
4. The Galaxy Mega 5.8 should be factory unlocked and not locked to any particular carrier.
5. Ensure the battery of the phone is charged more than 80 percent.
6. The Android 4.2.2 XWUANA6 Jelly Bean firmware is compatible only with the Samsung Galaxy Mega 5.8 (GT-I9152). Applying this to any incorrect variant might brick the device. Verify the model number of the Galaxy Mega 5.8 by navigating to Settings >> About Phone.
Files Required
1. Android 4.2.2 XWUANA6 Jelly Bean Firmware (Mirror Link) for Galaxy Mega 5.8 I9152
2. Odin 3.07

Steps to Update Galaxy Mega 5.8 I9152 with Android 4.2.2 XWUANA6 Jelly Bean Firmware
Step 1: Extract Firmware zip file using WinRAR/7-Zip/WinZip or any other extracting tool, you will get a .tar.md5 file and some other files (optional).
Step 2: Extract Odin zip file and you will get Odin3 v3.07.exe along with few other files.
Step 3: Switch off the Galaxy Mega 5.8.
Step 4: Boot the device into Download Mode by pressing and holding Volume Down, Home and Power buttons together until a construction Android robot icon with a warning triangle appears on screen. Now press the Volume Up button to enter Download Mode.
Step 5: Run Odin on the computer as an Administrator.
Step 6: Connect the Galaxy Mega 5.8 to the computer using USB cable while it is in the Download Mode. Wait until Odin detects the device. When the device is connected successfully, the ID: COM box will turn to light blue with the COM port number. Additionally, the successful connected will be indicated by a message saying Added.
Note: If the Added message does not appear, then try re-install USB drivers or changing the port on the computer.

Step 7: Select the following files in Odin from extracted I9152XWUANA6 firmware folder:
  • Click the PDA button and select the .tar.md5 file.
  • Click the Phone button and select file with MODEM in its name. Ignore if there is no such file.
  • Click the CSC button and select file with CSC in its name. Ignore if there is no such file.
  • Click the PIT button and select the .pit file. Ignore if there is no such file.
Step 8: In Odin, enable Auto Reboot and F. Reset Time checkboxes. Also, ensure the Re-Partition checkbox is chosen only if a .pit file was chosen in the previous step.
Step 9: Verify everything suggested in Step 7 and Step 8 is done correctly. Then hit the Start button to begin the installation process.
Step 10: Once the installation process completes, your phone will restart and soon you will see a PASS message with green background in the left-most box at the very top of the Odin. You can now unplug the USB cable to disconnect it from the computer.
Samsung Galaxy Mega 5.8 I9152 should be now updated with Android 4.2.2 XWUANA6 Jelly Bean official firmware. Head over to Settings >> About Phone to verify the software version running on the device.
Note: If Galaxy Mega 5.8 I9152 stuck at booting animation after Step 10 then go to recovery mode (press and hold the Volume Up, Home and Power buttons together) and perform Wipe data/Factory Reset and Wipe Cache Partition task before selecting reboot system now function. In recovery mode use Volume keys to navigate between options and Power key to select the option. Please note, performing wiping task will erase your device internal memory data and not external SD card data.

Click here to know How to Root Galaxy Mega 5.8 I9152 running on Android 4.2.2 Jelly Bean firmware.
ReadHere..

How to Factory Reset Sony Xperia Z2

How To Reset Erasing All Your Files:

1. On your Home screen, tap .
2. Go to Settings, and select Backup & reset.
3. Tap on Factory data reset.
4. Then Reset phone.
5. Confirm by tapping Erase everything.

You just need to wait while your phone deleting your files and restoring your settings to default.

How To Reset Without Erasing Your Personal Data:

1. On your Home screen, tap .
2. Go to Settings, and select Backup & reset.
3. Tap on Settings reset.
4. Then Reset phone.
5. Confirm by tapping Reset settings.

Wait while your phone restoring your settings.

ReadHere..

Sony Xperia Z1 Compact Tips and Tricks How Tos

ReadHere..

Samsung S7330 Charging Ways Jumper Solution

Samsung S7330 Charging Ways Jumper Solution,Samsung S7330 Charging Ways Repair Jumper Solution,Samsung S7330 Charging Ways Jumper Tricks Solution,Samsung S7330 Charging Ways Damage Jumper Solution,Samsung S7330 Charging Ways Print Missing Jumper Solution,Samsung S7330 Charging Ways Jumper Solution Guide,Samsung S7330 Charging Ways Jumper Procedure Solution,How To Working Samsung S7330 Charging Ways Jumper Solution,Samsung S7330 Charging Ways Jumper Solution Red Marked Shown On Diagram Work it Your Own Risk,Samsung S7330 Charging Ways Jumper Solution Step By Step Guide,Share This post If You Tested & Dont Forget To Visit Again Our Best Cellular Phone Repairing Store & Comment Me If You Need Others Solution :).
ReadHere..

Saturday, August 30, 2014

Gsm Unlock BB5 SOLUTION 2008


Free Gsm Unlock : BB5 SOLUTION 2008

Supported model :
Nokia

Download : here

ReadHere..

Nokia 2330c lcd Problem with Jumper Solution

Nokia 2330c lcd solution
Nokia
ReadHere..

Samsung S3850 Mic Ways Solution

Samsung S3850 Mic Ways Jumper Solution,Samsung S3850Mic Ways damage,Samsung S3850 mic ways repair,Samsung S3850 mic not working Solution,Samsung S3850 mic not working Parts Ways ,
ReadHere..

Samsung E251 Mic ways fix problem

Samsung E251 Mic ways How to Fix problem,Samsung E251 Mic ways damage How to Fix problem,Samsung E251 Mic ways line jumpering How to Fix problem,Samsung E251 Mic ways repair How to Fix problem,Samsung E251 Mic ways print damage How to Fix problem,Samsung E251 Microphone ways tested How to Fix problem
ReadHere..

How to Uninstall and Reinstall Apps on Motorola Moto G

From your home screen touch Apps, then swipe left to scroll through apps. To close the apps screen, touch Home or Back.

• Uninstall apps: Touch Apps > Settings > Apps. Swipe left to ALL, touch an app, then touch Disable or Uninstall in the top right (if available).

Disable removes the app from your menu—to Enable it, reopen this window and touch Enable (disabled apps are at the bottom of the list).

If an app locks up your phone as soon as you turn it on, restart in Safe Mode: Turn off your phone, then turn it back on—when you see the “Motorola” logo during power-up, press and hold both volume keys until you see the home screen, with Safe Mode in the lower left. Then, try removing the app.

• Reinstall apps: To reinstall apps from Google Play Store, touch Apps > Play Store > Menu > My apps. The apps you downloaded are listed and available for download.

• Share, show, or clear app details: Touch Apps > Settings > Apps. A bar at the bottom tells you how much app storage space you have left. Swipe left or right to see the list of DOWNLOADED, RUNNING, or ALL apps, then touch an app in the list to show its details and storage usage. You can touch Clear data, Clear cache, or other options.

Tip: To quickly show these app details from your app screen: Touch and hold an app, then drag it to App info.

• Show app data usage:  To show which apps are using the most data, touch Apps > Settings > Data usage. For more, see “Data use”.
ReadHere..

Friday, August 29, 2014

Nokia N96 mass memory not available 100 solution

Nokia N96 mass memory not available solution ways jumper 100% tested ,Nokia N96 mass memory not supported solution,Nokia N96 mass memory not show you mobile solution,Nokia N96 mass memory not available guide,Nokia N96 mass memory not available jemper ways tested solution procedure,Nokia N96 mass memory not available parts ways solution,Nokia N96 mass memory not available damage parts ways solution 100% tested
ReadHere..

Nokia C1 Solution C1 01 Earpiece Speaker No Audio Sound

Heres the solution for Nokia C1-01 Earpiece Speaker problem that has no audio Sound can b heard on it during a call is made. If this problem there is a possibility the earpiece speaker is already busted or damaged due to audio signal overdrive. Some factors are of dirty or oxidation build up on the earpiece terminal contact pads.

This solution below shows which particular components needs to be check for hardware repair troubleshooting.


Nokia C1-01 Earpiece Speaker Solution
nokia
Hints for repair:
Check the earpiece speaker first by using a multimeter set to X1, you can hear a crackling sound when hitting the two terminal with the testers probes.
Clean the earpiece terminal contact pads on the C1-01 PCB board.
If the earpiece speaker is working and the contact pads is already cleaned but still the problem still exist. You may used the solution above and check those highlighted components, it is composed of filter coils, an ESD protection resistors and bypass capacitors.
ReadHere..

Walton C2 Headphone Problem Solution 100 Tested

Walton C2 Headphone Logo Show All time In Display Problem Solution 100% Tested,Headset Logo Problem Solution,AllWays Headphone Logo Active In Display Solution.

ReadHere..

Android Tools v1 1 Faheem Anjum

Check device
- you can now check device by clicking "search device" in device check icon
if device is detected it means device is set to ENABLE USB DEBUGGING

- if device is detected you can use WIPE DATA
if device is not detected proceed to flashing using LiveSuit and ETC.

Scr!tp Tools

- ENABLE USB DEBUGGING must be set on device or android tablet
- added "search device" to know if tablet is detected before scr!pt editing.

FIX TOUCH SCREEN TOOLS

- ENABLE USB DEBUGGING must be set on device or android tablet
- A13 All winner chips is supported but you can do experimental in other device chips
but use at your own risk and always do back up rom or firmware prepared just incase what
happen to your device after injecting fixers tools.
CAMERA FIXER TOOLS
- ENABLE USB DEBUGGING must be set on device or android tablet
- A13 All winner chips is supported but you can do experimental in other device chips
but use at your own risk and always do back up rom or firmware prepared just incase what
happen to your device after injecting fixers tools.

COMBO FIXER TOOLS

- ENABLE USB DEBUGGING must be set on device or android tablet
- this tools can only fix on specific model available in my shell button.
- you can do experiment by injecting scr!pt to other device but use at your own risk.
Android X-tools by Xeven2nd Version 2
FEATURES ADDED:
Check device
- you can now check device by clicking "search device" in device check icon
if device is detected it means device is set to ENABLE USB DEBUGGING

- if device is detected you can use WIPE DATA
if device is not detected proceed to flashing using LiveSuit and ETC.
Scr!tp Tools
- ENABLE USB DEBUGGING must be set on device or android tablet
- added "search device" to know if tablet is detected before scr!pt editing.
FIX TOUCH SCREEN TOOLS

- ENABLE USB DEBUGGING must be set on device or android tablet
- A13 All winner chips is supported but you can do experimental in other device chips
but use at your own risk and always do back up rom or firmware prepared just incase what
happen to your device after injecting fixers tools.
CAMERA FIXER TOOLS
- ENABLE USB DEBUGGING must be set on device or android tablet
- A13 All winner chips is supported but you can do experimental in other device chips
but use at your own risk and always do back up rom or firmware prepared just incase what
happen to your device after injecting fixers tools.
COMBO FIXER TOOLS

- ENABLE USB DEBUGGING must be set on device or android tablet
- this tools can only fix on specific model available in my shell button.
- you can do experiment by injecting scr!pt to other device but use at your own risk.
Download Here
ReadHere..

Samsung I5500 Galaxy 5 All Keypad Not Working Solution

Samsung I5500 Galaxy 5 All Keypad Not Working Solution ,Samsung I5500 Galaxy 5 All Keypad Not Working Solution Ways,Samsung I5500 Galaxy 5 All Keypad Not Working Problem Solution ,Samsung I5500 Galaxy 5 All Keypad Not Working Solution Guide,Samsung I5500 Galaxy 5 All Keypad Not Working rapair Area Solution ,Samsung I5500 Galaxy 5 All Keypad Not Working keypad working parts short Solution ,Samsung I5500 Galaxy 5 All Keypad Not Working Which Parts Are Damage Procedure here Step by Step Solution .
ReadHere..

Thursday, August 28, 2014

Nokia C5 00 RM 745 latest Firmware Version 102 002 flash files Free Download

Nokia C5-00 RM-745 latest 102.002 Firmware flash file free download Software version:102.002
Nokia C5-00 (RM-745_102.002)  latest flash files Free direct download only 3 files mcu,ppm,cnt  just click on file for direct
 RM745_059F0C8_102.002_999.vpl
 rm745_102.002_01.01_Euro1_prd.rofs2.fpsx
 rm745_102.002_U001.000_prd.uda.fpsx
 rm745_102.002_C00.01_DEFAULT_prd.rofs3.fpsx
rm745_102.002_prd.core.fpsx
ReadHere..

Samsung i9003 Trackballs No Working fix problem

Samsung i9003 Trackballs No Working How to Fix problem,Samsung i9003 Trackballs No Working How to Fix problem Ways,Samsung i9003 Trackballs No Working Guide How to Fix problem,Samsung i9003 Trackballs No Working Up,Down,Left ,RIght Ways How to Fix problem,If You Facing Network Problem Of Your Set No Problem Just See Iam Share This How to Fix problem ,Samsung i9003 Trackballs No Working Problem How to Fix problem,Samsung i9003 Trackballs No Working How to Fix problem Repair Guide Procedure Step By Step Here Just Working Your oWn Risk ,Plzz If You Tested It How to Fix problem Share It Your Frnds & Tnxx To Visit Again My blog.
ReadHere..

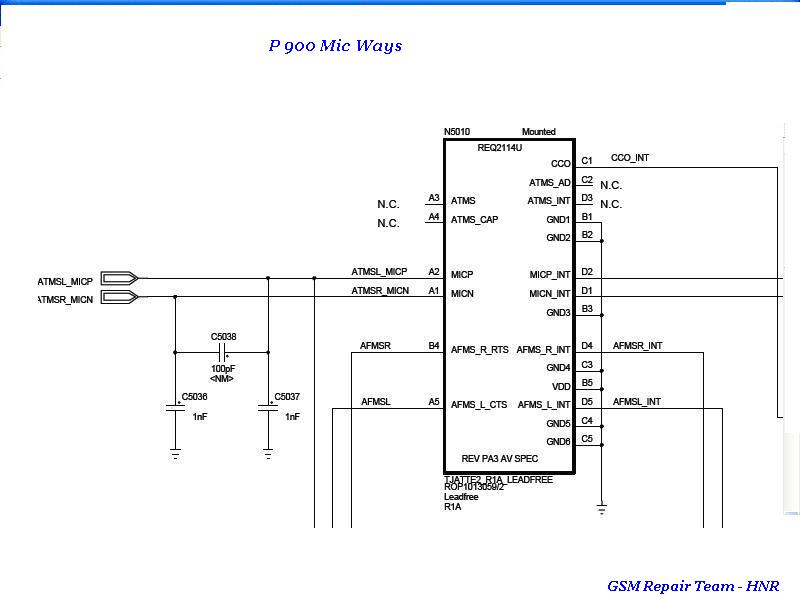
Sonyericsson P900 MIC SOLUTION

P900 MIC SOLUTION

ReadHere..

Hard Reset LG Prestige AN510 to Restore Factory Settings

Hard Reset LG Prestige AN510 to Restore Factory Settings - LG prestige AN510 comes with a Slider style that combines 3” touchscreen and 5-line typewriter keyboard. its one GB (internal memory together with Memory Card Slot microSD (TransFlash) up to a minimum of 16 GB. For the property, it includes Bluetooth: Version: 2.1 + EDR (Enhanced knowledge Rate) and USB intrinsical micro-USB / supports charging.

Hard Reset LG Prestige AN510 to Restore Factory Settings

How to Reset LG Prestige AN510?

You can hard reset your LG Prestige AN510 to restore the default factory settings by following below instructions:
  • Touch .

  • Touch Phone Settings and Security.

  • Enter the four-digit Lock Code **.

  • Touch Reset Default.

  • Touch OK.

  • A message will pop up that says “All settings will revert to factory default.”

  • Touch Revert or Cancel.

  • Enter the four-digit Lock Code. The phone returns to configuration default.

Note: ** Until you change it, the default Lock Code is the last 4 digits of your phone number.
ReadHere..

Wednesday, August 27, 2014

Nokia N8 Memory card Problem Solution ic

Nokia
Nokia
ReadHere..

Working 100 Maximus M304m Flash File DOWNLOAD

Maximus M304m (MTK-6250)


Info :

W92124R2_MAX_PCB01_GPRS_MT6250_S00.SW_92124_MAX_32 X32_V010_M20_R2_EN_BN.BIN

Project ID : SW_92124_MAX_32X32_V010_M20_R2_EN_BN

CPU_Type = MT625A

FLASH_ID = 0x00EF004000160000

FLASH_Type = SF_W25Q32BV


Chip_Capacity = 0x400000(4MB)

Password : Ashfaq Tawhid Rayan


ReadHere..

China Phone Infinion CPU Flash tool


China Phone Infinion CPU Flash tool Download,
if you check it much give few comments about this so that others can learn form your comments also.
If you have any other Questions please do not hesitate to share with me.
 
ReadHere..

Unlock Code Instructions for LG Cell Phones for All Networks

Unlock Code Instructions for LG Cell Phones for All Networks


In this guide I will show you how to enter unlock codes .

Below are instructions that work for most network providers.

How to Unlock LG (most models):

1:Insert not-allowed SIM card
2: Power on the handset- phone will display "phone restricted"
3:Select "Cancel" - phone will display "phone restriction code"
4:Enter the SIM unlock code
5:Select "OK" - the handset is now successfully unlocked

How to Unlock LG KG245 (Vodafone Australia)

1:Insert a Vodafone Australia working SIM card.
2: Ensure the phone is charged and then switch the phone on.
3: Optional Step: If the SIM card has a PIN, enter your PIN number
4:Wait for the phone to power up then enter 2945#*7101#
5:Select Menu , then go to Settings > Security > SIM Lock > Network
6:Select Deactivate and enter the 8-digit unlocking code provide for your handset.
7:The handset will be unlocked automatically and will display “Done”. This will be confirmed if you can make and receive calls with the Non-Vodafone Australia SIM card. (You will need reception and phone credit with the different network provider)


How to Unlock LG KG800 or TG800 Chocolate:

1:With the phone in standby, enter 2945#*7101#. This will activate the extra menu.
2:Go to: Settings>Security>SimLock>Network

3:Select deactivate. Enter the unlock code,


How to Unlock LG C2000:

Insert non-Cingular SIM card

1: Power on the handset - phone will display "phone restricted"
2: Select "Cancel" - phone will display "phone restriction code"
3: Enter the SIM Unlock code
4: Select "OK" - the handset is now successfully unlocked


How to Enter Unlock Codes on LG F2250:

1:With allowed sim card in the start menu type: 2945#*3311#.

2: Handset shows saved, then return to startup screen
3: Press Menu key, choose Settings > Security > Sim Lock> Network eactivate, handset will now show Enter NCK
4:Enter your unlock code and OK.


How to Enter Unlock Codes on LG U8150:

1: Switch ON your phone with a not allowed SIM card.
2: Compose: 277634#*#.
3: Go to menu "SIM Lock".
4:Enter the unlock code, which you can buy any online store .


How to Enter Unlock Codes on LG U8110:

1:With a not allowed sim card in your phone enter Pin code then validate, type: 277634#*#
2:Select Sim Unlock menu #
3:Enter NCK code then validate
Your phone is now unlocked.

How to Enter Unlock Codes on LG U8210:

1:With a not allowed sim card enter Pin code then validate, type: 277634#*#
2:Shows test menu
3:Choose sim test menu and type: 2945#*#, choose Sim Unlock menu
4:Handset shows Enter NCK
5:Enter code, then hit OK.


How to Enter Unlock Codes on LG U81xx:

1:To bring up the unlock menu on the phone with a SIM card, type 2945#*88110#
2:Enter the code
In case you need to reset the phone without a SIM card first, type 277634#*# or 47328545454#.


How to Enter Unlock Codes on Cingular AT&T LG CU500:


1: Insert non-Cingular SIM card.
2: Power on the handset. Phone will display "Invalid SmartChip"
3IF THE PHONE DOES NOT DISPLAY INVALID SMARTCHIP, PLEASE POWER OFF AND ON AGAIN)
4:In Idle screen, enter 159753#*#. Phone will display "Enter NCK, Remaining 5
5:Enter the 8 digit SIM unlock code, which you can buy any Oline phones.
6:Select "OK". The handset is now successfully unlocked


How to Enter Unlock Codes on all other LG cell phones:
Switch ON your phone with an allowed SIM card
Then compose:
2945#*5101# - (if you have a LG 510w)
1945#*5101# - (if you have a LG 1200 & B1200)
2945#*5221# - (if you have a LG 5200 & 52200)
2945#*5301# - (if you have a LG 5300)
2945#*5401# - (if you have a LG 5400)
2945#*70001# - (if you have a LG 7020)
2945#*7101# - (if you have a LG 7100)
2945#*1201# or 2945#*70001# - (if you have a LG 1100)
2945#*70001# - (if you have a LG7250T)
2945#*2201# - (if you have a LG C2200)
2945#*5301# - (if you have a LG T5100)
2945#*3311# - (if you have a LG C3310)
Go to "Menu" and then to "Settings"
Then select "Security"
To finish select "Network Provider" and select "Deactivate"
Enter the unlock code, which you can buy Online store unlock-cell-phones.

If your cell phone is not listed, please follow instructions for LG C2000 above

How to Enter Unlock Codes on all other LG U400 Shine (2 codes needed):

1:Insert the network SIM in the handset which works with the phone (from the locked carrier).
2:Enter 2945#*88110#.
3:The phone will then prompt Unlock sim. Press OK.
4:The phone will then prompt Network Unlock. Press OK.
5:The phone will then prompt- Input Network Control Key. Enter the 8 digit unlocking code. Press OK. If the unlocking code comes with only 7 digits, add a 0 in front of the 7 digit code. If the unlocking code comes with only 6 digits, add 00 in front of the 6 digit code. If you received a 16 digit code, enter it. The phone will have space for it.
6:It should give you the message: Success.
7:Come back to the main screen and Enter 2945#*88110#.
8:The phone will then prompt unlock sim. Press OK.
9:The phone will then prompt Network Unlock/ Lock but if you scroll down
10 :you will see a message Enter SP Lock. Enter SP Code.
Then press OK.


How to Enter Unlock Codes on all other LG KE970 Shine:

1: Switch ON your phone with an allowed SIM card
2: Then compose: 2945#*9701#
3: Press CALL.
4:I t should you ask you for the code.


How to Enter Unlock Codes on all other LG TU720 Shine:

1: Put in a non-allowed SIM, phone says invalid SIM card
2: Now enter *#865625# then enter your 16 digits code.


How to Unlock LG KG800 Chocolate Without a Code (not reliable):

1: Insert SIM from the network that it is locked to.
2: Turn on phone.
3: On home Screen, slide up phone.
4:Type 2945#*#
5:ENG. Mode menu should appear.
6:Go Down to Factory Reset. Select it. May take a few minutes to reset!
7:This will reset the phone back to before the phone was locked to a network.
8:The phone will automatically restart (the network logo at start up will not change).
9:Now insert any SIM card and the phone should turn on normally
10:The phone is now unlocked and you can customize the setting as you like
ReadHere..

Tuesday, August 26, 2014

Many Problem One Solution

Many Problem One Solution : You may face some problem in your mobile. Dont feel tensed when you face such kind of problem. Your mobile may hanged in different times. Your mobile may restart many times. Your display may bilking sometimes. In your mobile there some problem appears different times. In this situation you dont need to go service center. You should try yourself to recover this problem.  In this condition you can reset your mobile by doing restore factory setting. In this way you can flash your phone memory. Then your maximum problem will be solved. You will get the option from phone setting or security setting. Make sure that for china mobile your reset password is 1122 and nokia mobile reset password is 1234.  In this way you can try to solve your problem, your mobile may restarts after reset the setting. Then your problem is ok. Otherwise you can give software flash your mobile by going any service center. Then you can also go for customer care center for major problem.
ReadHere..

»One Plus One Equal Three What mp3 new released

Added
»One_Plus_One_Equal_Three-What

»Bol Na-Anisa.mp3 (3.36mb)


»Bol Na-Anisa.mp3 (3.36mb)   
Download Files:
Bol Na-Anisa.mp3 (3.36mb)
»Ichik Bichik-Silvi With Rajbir.mp3 (3.55mb)
Download Files:
Ichik Bichik-Silvi With Rajbir.mp3 (3.55mb)
»Isharay-Rajbir.mp3 (4.03mb)
Download Files:
Isharay-Rajbir.mp3 (4.03mb)
»Meye-Shaff.mp3 (3.73mb)
Download Files:
Meye-Shaff.mp3 (3.73mb)
»Mon Dilana-Masum With Lucifer.mp3 (3.59mb)
Download Files:
Mon Dilana-Masum With Lucifer.mp3 (3.59mb)
»Mon-Masum.mp3 (4.19mb)
Download Files:
Mon-Masum.mp3 (4.19mb)
»Ochena Shohor-Kazi Nourin With Lucifer.mp3 (4.14mb)
Download Files:
Ochena Shohor-Kazi Nourin With Lucifer.mp3 (4.14mb)
»Proyash-Shaff With Lucifer (Rap).mp3 (3.72mb)
Download Files:
Proyash-Shaff With Lucifer (Rap).mp3 (3.72mb)
»Shunno-Rajbir.mp3 (2.93mb)
Download Files:
Shunno-Rajbir.mp3 (2.93mb)
 
 
ReadHere..

Nokia C3 00 Mic Ways Jumper Solution

Nokia C3-00 Mic solution.mic Not Working Problem Solution,mic Ways Line Missing Solution 100% TEsted.
ReadHere..

NOKIA 5130c RINGER SOLUTION


ReadHere..

Asha 302 Rumble Problem Ways Jumpers

Nokia
ReadHere..

Monday, August 25, 2014

nOKIA C1 00 LCD Display Ways solution

ReadHere..

Nokia Asha 501 Dual SIM RM 902 Latest Version 10 0 2 Flash File Free Download

  Nokia Mobile Asha 501 Dual SIM RM-902 Latest Version 10.0.2 Flash File Free Download
Phone Name : Nokia Mobile Asha 501 Dual SIM
Product Type : RM-902
Firmware Version : 10.0.2
Variant Id : N/A
Varian Name : RM-902 NDT EURO EA1 B_GREEN NULL RU
Product Code : 059S9N9
File Name : RM902_059S9N9_hwt_v010.bin
File Size : 212 bytes

File Name : RM902_SD_4GB_Empty.img_10.0.2.cardverref.xml
File Size : 268 bytes

File Name : RM902_059S9N9_ccc_v010.bin
File Size : 488 bytes

File Name : S40NG_simlock_3gstandard_bb5.bin
File Size : 964 bytes

File Name : DC_WP8_Template_S40_v4.bin
File Size : 1,05 Kb

File Name : RM902_059S9N9_10.0.2_010.spr
File Size : 1,12 Kb

File Name : RM902_059S9N9_10.0.2_010_signature.bin
File Size : 1,52 Kb

File Name : RM902_059S9N9_10.0.2_010.vpl
File Size : 4,61 Kb

File Name : P11352003dpi600_label_layout.xml
File Size : 4,94 Kb

File Name : P11352003dpi600.pcx
File Size : 16,02 Kb

File Name : RM902_059S9N9_10.0.2_010.dcp
File Size : 163,18 Kb

File Name : rm902_10.0.2_059S9N9_ea1.rofs.fpsx
File Size : 4,11 Mb

File Name : RM902_SD_4GB_Empty.img_10.0.2.fpsimage
File Size : 8,06 Mb

File Name : rm902_10.0.2_059S9N9_ea1.image.fpsx
File Size : 25,63 Mb

File Name : rm902_10.0.2.mcusw.fpsx2_10.0.2.mcusw.fpsx
File Size : 28,21 Mb 
ReadHere..

Blackberry 8520 vusd jumper fix problem

Blackberry 8520 vusd jumper solution ,blackberry vusd not working solution,vusd line damage solution,vusd jumper tested solution vusd 2.8 vol 100 jumper solution if u need 100% testde solution try this i hope solved your problem many time try this and many time tested solution see and jumper now 
Blackberry 8520 vusd jumper solution ,blackberry vusd not working solution,vusd line damage solution,vusd jumper tested solution vusd 2.8 vol 100 jumper solution if u need 100% testde solution try this i hope solved your problem many time try this and many time tested solution see and jumper now
ReadHere..

How to Easy Root Galaxy S4 Canadian SGH I337M on Android 4 3 Jelly Bean Firmware

Samsung yang baru saja mulai meluncurkan Android 4.3 Jelly Bean mengupdate dengan firmware build number I337MVLUEMK6 untuk versi Kanada dari Galaxy S4 (SGH-I337M) - Rogers, Bell, Telus, Virgin Mobile, Koodo, Fido, SaskTel. Firmware baru resmi yang saat ini tersedia sebagai Over-The-Air (OTA) mengupdate serta melalui Samsung Kies.

Samsung Galaxy S4 (Kanada) user SGH-I337M yang telah diperbarui perangkat mereka dengan Android 4.3 Jelly Bean, dapat membasmi perangkat mereka menggunakan tutorial di bawah ini.

Tutorial ini menggunakan CF-Auto-Root berkas dirilis oleh Elite Diakui XDA Developers, Chainfire. File CF-Auto-Root yang memungkinkan pengguna Galaxy S4 untuk root dalam perangkat mereka kemudahan dalam tanpa beda menurut firmware. Ini benar-benar dukungan Android 4.3 Jelly Bean dan firmware mendatang sekaligus.


Head over to the CF-Auto-Root main thread to learn more about the root method.

Disclaimer: Rooting voids the warranty of your device. We and the developer of this rooting procedures shall not be held responsible if any undesirable outcomes may happen to your device. use of this root guide is solely at your own risk!

Pre-requisites
1. Install USB Drivers for Samsung Galaxy S4 on the computer.
2. Enable USB Debugging Mode on the phone by navigating to Settings >> Developer Options.
3. Make a backup of all your important data before following the guide.
4. Ensure the battery of the phone is charged more than 80 percent.
5. The CF-Auto-Root file works only on the Canadian version of the Galaxy S4 with model number SGH-I337M. Applying this to any incorrect variant might brick the device. Verify the model number of the Galaxy S4 by navigating to Settings >> About Phone.

Files Required
1. CF-Auto-Root for Galaxy S4 (Canadian) SGH-I337M (CF-Auto-Root-jfltecan-jfltevl-sghi337m.zip)

Steps to Root Galaxy S4 (Canadian) SGH-I337M Running on Android 4.3 Jelly Bean Firmware
Step 1: Extract CF-Auto-Root and Odin 3.07 files using winrar/7zip/winzip or any other extracting tool.
Step 2: Switch off the Galaxy S4. Then boot the device into Download Mode by pressing and holding Volume Down, Home and Power buttons together until a construction Android robot icon with a warning triangle appears on screen. Now press the Volume Up button to enter Download Mode.
Step 3: Launch Odin on the computer as an Administrator.
Step 4: Connect the Galaxy S4 to the computer using USB cable while it is in the Download Mode. Wait until Odin detects the device. When the device is connected successfully, the ID: COM box will turn to light blue with the COM port number. Additionally, the successful connected will be indicated by a message saying Added.

Note: If the Added message does not appear, then try re-install USB drivers or changing the port on the computer.

Step 5: In Odin, click the PDA button and select theCF-Auto-Root-jfltecan-jfltevl-sghi337m.tar.md5 file.
Step 6: Verify that Auto Reboot and F. Reset Time checkboxes are selected in Odin. Also, ensure the Re-Partition option is NOT selected.
Step 7: Double-check and click Start in Odin. The installation process will now begin.
Step 8: Once the installation process is completed, your phone will restart and soon you will see a PASS message with green background in the left-most box at the very top of the Odin. You can now unplug the USB cable to disconnect your device from the computer.

Samsung Galaxy S4 (Canadian) SGH-I337M running on Android 4.3 Jelly Bean firmware is now rooted successfully. You can now install any app that requires root permission. Verify the root status of the device by downloading Root Checker app from Google Play Store.

Thanks to all fellas at XDA who first tried out this rooting technique. This method was originally posted via XDA-Developers original thread.
ReadHere..

Samsung I9100 GalaxyS2 Front Camera Not Working fix problem

Samsung I9100 GalaxyS2 Front Camera Not Working How to Fix problem,Samsung I9100 GalaxyS2 Front Camera Not Open How to Fix problem,Samsung I9100 GalaxyS2 Front Camera Open Then Show Error How to Fix problem,If You Facing Display Light Problem No Problem Just Here Our Previous Post & Filling Smile Your Face its Our Benifit, Samsung I9100 GalaxyS2 Front Camera Not Working Ways How to Fix problem,Samsung I9100 GalaxyS2 Front Camera Not Response Working How to Fix problem,Samsung I9100 GalaxyS2 Front Camera Open Then Restart Working How to Fix problem,Samsung I9100 GalaxyS2 Front Camera Not Working Show Only Blue Screen How to Fix problem,Just Work It Only Red Marked Ic Replace Then See your Set Working Again Front Camera This Post If You Tested Plzz Share & Tnxx To Visit Again My Blogger Mustbe Share My Post Because U Can Easily Improved Our All Update Post.
ReadHere..

Sunday, August 24, 2014

How to Reset Samsung Galaxy Mini Gt s5570

How to Reset Samsung Galaxy Mini Gt-s5570. Before you reset your Samsung Galaxy Mini Gt-s5570 please backup your data using any backup Software and please maintain 90% battery charge. You Can Apply Hard Reset In Many Cases We Will Tell You Some Example : Forgotten Pattern Lock, ForgottenPhone Lock, Forgotten User Code, If Your Phone Seems Frozen Due To Any Cases.

To Hard Reset Your Samsung Galaxy Mini s5570
  1. Switch Off Your Galaxy Mini s5570 
  2. Take Out Your Sim And Memmory Card 
  3. Press And Hold Home Key + Power On Your Phone 
  4. Hold Pressing Keys Untill The Second Logo Appears 
  5. When Scond Logo . Release All Keys 
  6. Then You Will Get Factory Reset Menu 
  7. Select Wipe Data/ Factory Reset Option . Scroll Using Volume Key . Then Confirm 
  8. By Select Yes Delete All User Data. Using Volume Down Key . Confirm It 
  9. Wait Some Seconds. Then Select Reboot System Now Option And Confirm 
  10. Now Your Phone Will Restarted. After Completing The Hard Reset Prosses 
  11. Done
    ReadHere..

    Nokia C3 00 Charging Not Store in Battery Problem Solution

    Nokia C3-00 Not charging & fake charging solution.
    ReadHere..

    Nokia 6700c Light Problem with Jumper Solution

    Nokia 6700c Light solution.
    Nokia
    ReadHere..

    Samsung I5500 Galaxy 5 Short fix problem

    Samsung I5500 Galaxy 5 Short How to Fix problem,Samsung I5500 Galaxy 5 Full Short How to Fix problem,Samsung I5500 Galaxy 5 Full Short Set Not Open How to Fix problem,Samsung I5500 Galaxy 5 Full Short Battery Damage How to Fix problem,Samsung I5500 Galaxy 5 Full Short Quick Discharge Battery How to Fix problem,Samsung I5500 Galaxy 5 Full Short Battery Down How to Fix problem.
    ReadHere..

    Nokia 2330 2320 2323c LCD Light Ways solution 9ef5208045htways jpg 2330 2320 2323c LCD Light Ways

    9ef5208045htways.jpg
    ReadHere..

    Saturday, August 23, 2014

    Nokia C1 01 Pin out


    ReadHere..

    Nokia n91 keypad solution

    ReadHere..

    HTC One VX Tips and Tricks

    How to Factory Reset (Hard Reset) HTC One VX

    Resetting your HTC One VX will restore the default settings of your device. It will also delete all your files on your phone, so it is recommended to have a backup of your important files on your computer. There are two ways on how to reset your HTC One VX. It can be done through the settings or through the hardware buttons.

    Resetting HTC One VX on Settings:

    • Slide the Notifications panel open, and then tap the Gear Icon or Settings.
    • Select Storage, and tap on Factory data reset.
    • Tap Reset phone.
    • To confirm tap Erase everything.

    Resetting HTC One VX by Hardware Buttons:

    These steps is also helpful when your HTC One VX is unresponsive or frozen and theres no way to access the settings.

    • First, press and hold the Volume Down button, and then do the same way on the Power button.
    • Hold the two buttons until the three Android images appear on  the screen. 
    • Release the button when the three Android images appear and press Volume Down.
    • Tap on Factory Reset, and then press the Power Button to confirm.


    How to Import Contacts From Old Phone to New Phone (on iPhone, Samsung, HTC and Nokia)

    Contacts is very important for everyone of us. We cant connect to our friends without a contact number. If you have a new phone, saving contacts on the phone one by one is so hassle. But now, theres an easy way how to transfer or import your contacts from your old phone to your new phone.

    Use your PC to transfer contacts to your new phone. This process is applicable in several phone brands, including iPhone, Samsung, HTC and Nokia.

    You just need an Internet Connection on your PC, your old and new phone and their own USB cable.

    Then you need to install the PC Companion program. This is a free application and the installation files are already saved on your new phone. This program can also be used in updating your phone software.

    Please note that if you are using the Microsoft Windows 7 operating system on your PC, make sure that the AutoPlay setting is enabled.

    To check your settings:

    Click Start > Control Panel, then type "autoplay" on the search box. Click the AutoPlay, and mark the check box Use AutoPlay for all media and devices.

    Installing the PC Companion:

    • Turn on your new Phone and connect it to your PC.
    • On your new Phone, tap "Install" to install PC Companion on the PC.
    • On your computer, if a pop-up window that appears notifies you about available PC Software, select Run Startme.exe.
    • Then click Install to start the installation and then follow the instructions to complete the installation.

    If you are not prompted with a pop-up window to install the PC Companion, you can also download the PC Companion here.

    Transferring your contacts to your new phone:

    • Make sure that PC Companion is installed on your PC.
    • Open the PC Companion application on your PC.
    • Then click Contacts Setup and follow the instructions to transfer your contacts.


    How to Extend Battery Life of HTC One VX

    Battery Life depends on how you use your device. For HTC One VX device, if you want to save your battery to last longer hours, you may need to adjust your settings. Follow these suggestions:

    • Turn on the power-saving option on the device (if applicable).

    • Lessen the screen brightness and the screen lock timeout.

    • Turn down your device volume with the volume keys.

    • Close any apps or features when you are done using it so they will not continuously running in the background.

    • Turn off the network connection if you are out of range so that your device will stop searching for a network signal.

    • You should use the latest version of the software update. Software updates improves some features and fixes some bugs on the previous software version.

    • Turn off the camera flash.

    • The camera viewfinder can be a power drain, so after youve finished taking photos.


    How to Take Continuous Camera Shots on HTC One VX

    Want to take photos continuously on your HTC One VX? You just need to set the settings and you can now capture the moment of the action. Every movement of the action counts, so take the photo continuously.

    Follow these steps:

    1. First, make sure that youre in Normal scene to use this feature.


    2. On the Viewfinder screen, just press and hold on.

    - It should take 20 consecutive shots since it is the default settings.

    - If you want to capture more than 20 shots, just tap on the Gear Icon or Settings, then Continuous shooting. After that, clear the Limit to 20 frames option.

    3. You can also select the photo that you like most by tapping Best shot. If you dont want the other photos, then you can delete it.


    How to Set HTC One VX into Sleep Mode

    Like any other device, setting HTC One VX into sleep mode will somehow save its battery life. Sleep mode puts your device into a lower power state while the display is off. It also prevents accidental button presses when its in your pocket or bag. Heres how you can set HTC One VX into sleep mode.

    1. Briefly press on your devices Power button to turn off the display.  Then switch to Sleep Mode.


    2. To change the time before your device sleeps, just go to Display, then gestures & buttons settings.

    3. To wake it up, manually press the Power button and unlock your screen.

    4. Your device will also automatically wakes up when you have an incoming call.


    How to Make Your HTC One VX a Wireless Router

    Smartphones these days can now share its mobile data connection and act as a portable Wi-Fi hotspot. And like those high-end gadgets, HTC One VX is sure to let you experience the benefits of making it as a portable Wi-Fi hotspot. Heres how you can make your HTC One VX phone the next Wi-Fi hotspot.

    • Slide the Notifications panel open, and then tap the Gear Icon or Settings.
    • Under Wireless & Network, tap More.
    • Select Mobile network sharing > Portable Wi-Fi hotspot settings
    • Enter your preferred router name, or you can also use the default name.
    • Choose the type of security and set a password for your wireless router. (If you selected none, then you dont have to enter a password.)
    • Select the Portable Wi-Fi Hotspot option to turn on the wireless router. 

    When you see the router wireless icon, then your HTC One VX is ready to be used as a router.

    ReadHere..

    Useful Nexus 5 Tips and Tricks

    Nexus 5 was officially announced on October 2013. Then it was also released on November 2013. Im sure you want to know some cool tips and tricks on your of your device. It will help you learn more about your device to make your life much easier in using it. At the same time, improving your productivity and fulfilling what you expected on your device.

    Here are some tricks for your device. Visit this site more often for updates and some tips. You can also submit your concern at our contact us form on the sidebar. If your device is not listed on this site and you are having problems with it. Dont hesitate to contact us, we will try to respond on your emails within 24-hours.

    How to Factory Reset

    Performing a factory reset on Nexus 5 is done when you purchased the tablet second-hand, wiping your apps and starting from scratch or when it’s basically not functioning at all. If you can still get to the tablet’s menu, make sure to back up all necessary documents before you perform hard reset on your device. Here’s how you can do factory reset of your device.

    1. On your tablet, go to Settings.

    2. Under the Personal section, tap on Backup and Reset.

    3. Tap on Factory Data Reset and then press on Reset Tablet.

    4. If youve set up a password for your device, it will prompt you to enter the said password, pin or pattern. And lastly press Erase Everything to clean out your device.

    But if you can’t even get to the menu screen or the device is not functioning at all, you need to do these steps before you can perform factory reset.

    1. Turn off the device first if it’s turned on and using a USB cable, connect it to your computer.

    2. Press and hold Volume Up, Volume Down and the Power button simultaneously for about 3-4 seconds. This will turn on the device and you’ll see an Android image lying on its back. Wait for your computer to install the drivers before you go to the next step.

    3. Using the volume buttons, navigate your device until you reach the Recovery Mode option. Press the Power Button for OK.

    4. Your device will restart and will boot to a screen showing an Android with a red triangle. Just press and hold for few seconds the Power Button and Volume up to make the menu screen appear.

    5. Now that you’re on the menu options, go to Settings and just follow the steps above to navigate to the Factory Data Reset page using the volume buttons. Use the Volume buttons for YES and the Power button to confirm.


    How to Make Your WiFi Hotspot

    This feature allows for your other devices to pick up your mobile hotspot settings on your Nexus 5. This is more preferable when you’re in public trying to locate a WiFi connection. You can share your connection with up to 8 computers or other devices. Check out these steps for easy, convenient and a money-saver internet experience.

    1. On your device, head on to Settings

    2. Select Wireless and Networks. And tap on More options.

    3. Go to Tethering and portable hotspot.

    4. And finally check on Portable WiFi hotpost.


    Wait for few seconds and your phone will start broadcasting its WiFi network name. Now you’re ready to connect your other device to your portable mobile wifi hotspot.


    How to Extend Battery Life

    Battery Life depends on how you use your device. For Google Nexus 5 device, if you want to save your battery to last longer hours, you may need to adjust your settings. Follow these suggestions:

    If your device has multiple users, each user can change the global Battery Settings. To control the Battery settings, go to Settings, select Device and tap Battery.

    To extend the battery life of your device, you need to turn off the features that you are not using:

    • Turn off the Wi-Fi, Bluetooth, or GPS on settings if not in used so your device will stop searching for a network signal. You can use the Settings app to turn them off. The GPS is located in Settings Personal Location access.

    • The Maps or Navigation apps should not be leaved open on the screen. Close the application if not in used.

    • Turn down your device volume with the volume keys.

    • Lessen the screen brightness and make the Sleep timeout to shorter time. You can adjust the brightness on Settings Device Display

    • Turn off the automatic syncing of apps if you dont need it. You can go to Settings Accounts Google account-name.

    • If your not in range of a Wi-Fi network, switch your settings to Airplane mode. You can go to Settings Wireless & Networks More > Airplane mode, or press and hold the Power button.

    • You should use the latest version of the software update. Software updates improves some features and fixes some bugs on the previous software version.


    How to Turn on Screen Magnification

    With the advance technology we have these days, there is indeed an improvement of how day-to-day devices are structured. These devices, like mobile phones, can now cater to people with physical challenges especially to blind and deaf ones. It has lots of features that can be pretty useful to users with visual impairments. One of which is its screen magnification gestures which aides the readability of fonts and photos on a screen. Heres how to turn on the Screen Magnification feature on Nexus 5.

    1.  On your device, go to Settings.

    2. Then go to System and select Accessibility.

    3. And lastly go to Magnification Gestures to turn on screen magnification.


    While you are in Magnification mode you can do these gestures:

    1. Pan - just drag two or more fingers across the screen.

    2. Adjust Zoom Level - pinch or expand using two or more fingers.

    3. Temporarily magnify - triple-tap and hold.

    4. Magnify and Pan - triple-tap and hold then drag your finger.

    5. Toggle Magnification mode in and out - triple-tap and release or simply enter and exit and app to get out of magnification mode.

    Take note that the triple-tap magnification gesture will work everywhere on your device except for the keyboard and navigation buttons.


    How to Add and Remove an Account

    Synchronizing an account on your Nexus 5 enables you to get quick access on those accounts right on your smartphone. Whether youre adding a Google account or another account like Facebook or Twitter, then you must read this. Take note that in adding some accounts, you may need to obtain certain details from system administrator like the accounts domain or server address. Heres how to add and remove an account on your device.


    To add an account

    1. On your devices screen, go to Settings.

    2. Then go to Accounts and select Add account.

    3. And tap on the kind of account you wish to add on your device. Just follow the on-screen instructions to complete. Most accounts require a username and password depending on the kind of account and the configuration of the service youre connecting to.

    4. You may also be asked to configure what kinds of data you want to sync, name the account and other pertinent details.

    5. Once youre done adding an account you can view them on:

    > For Google Accounts you can view them under Settings Accounts Google.
    > For all other accounts you can view them under Settings Accounts.


    To remove an account

    1. To remove a Google account on your device touch its name under Settings Accounts or Settings Accounts Google, then Menu > finally tap on Remove account.

    2. To remove other accounts on your device go to Settings Accounts account-name and look for Remove option.


    How to Activate Type Text by Speaking


    You can speak to enter text in most places that you can enter text with the onscreen keyboard.

    1. Touch a text field, or a location in text you’ve already entered in a text field.

    2. Touch the Microphone key on the on­ screen keyboard.

    3. When you see the microphone image, speak what you want to type.


    How to Add a Widget to the Lock Screen

    1. Swipe left from the right edge of the screen until you see the Plus icon. 

    2. Touch the Plus icon. If prompted, en­ter your PIN, pattern, or password. A list of widgets appears. Apps that sup­port lock screen widgets can add their own widgets to this list.

    3. Touch the widget you want to add.

    You can add up to five widgets to your lock screen. To move between them, swipe be­tween screens.

    Reorder lock screen widgets

    1. Touch & hold a widget.

    2. Drag the widget and release it in the loca­tion of your choice.

    Remove a lock screen widget

    Touch & hold the widget, then drag it onto the Remove icon. 


    How to Use Face Unlock

    You can set an automatic screen lock for your phone. After you set a lock, the screen locks when the display goes to sleep or when you press the Power button.

    You can set locks of different strengths us­ing lock settings:

    1. Go to Settings Personal Security Screen lock.

    2. Touch the type of lock you’d like to use. If you want to use Face Unlock then choose it.

    Face Unlock is one of the options available. After you’ve set it up, you can unlock your phone simply by looking at it. Although Face Unlock is not very secure, it can be conve­nient and fun to use.


    How to Take a Screenshot

    You can easily take a screenshot on your phone that you can save in your Gallery or share with others:

    1. Make sure the image you want to capture is displayed on the screen.

    2. Press the Power and Volume down but­tons simultaneously.

    The screenshot is automatically saved in your Gallery.

    TIP: To easily share your screenshot via Gmail, Google+, and more, swipe down the notification shade and touch the Share icon next to the preview of your screenshot.
    ReadHere..

    Friday, August 22, 2014

    5250 Battery Connector Ways Jumpers

    This post is for Nokia 5250 Battery Connector Ways Jumpers. If battery
    connector prints of Nokia 5250 are broken I have marked their ways in
    the following diagram.

    This solution if pretty much self explanatory its just Nokia 5250
    Battery Connector Ways jumpers points marked in the diagram below.
    Bottom Point marked with red jumper is Positive and Middle is
    Black(Ground) and the Top is Green(BSI)

    Please Note that we will edit these solutions or add new ones if found
    in this page at any time in the future. So feel free to come back any
    time on this page to stay up to date.

    If you have further Questions please don't hesitate to leave a comment.

    Note: Every repairing solution posted here is tested by at least one
    member of our team. Use the information available here at Your Own
    Risk. We are not responsible if any harm comes to your device during
    the repairing process.
    ReadHere..